App Setup: Difference between revisions
| Line 34: | Line 34: | ||
[[File:GR app GreenPurpleMarkers.jpg|none|thumb]] | [[File:GR app GreenPurpleMarkers.jpg|none|thumb]] | ||
Green is reserved for completed records. Red, Blue, Purple, Yellow and Orange are currently the other colors available for the 'TO DO' map markers. These are set | Green is reserved for completed records. Red, Blue, Purple, Yellow and Orange are currently the other colors available for the 'TO DO' map markers. These are set when the [[https://wiki.goldenretrieverapp.com/index.php?title=Dictionary_Creator#Upload_Supplied_Data|utility supplied data is prepared]]. | ||
[[File:GR MapMarkerColors2.jpg|none|thumb]] | [[File:GR MapMarkerColors2.jpg|none|thumb]] | ||
Note: The colors do not show the same on iOS and Android - the colors shown here are how they display on Android. | Note: The colors do not show the same on iOS and Android - the colors shown here are how they display on Android. | ||
When | When first select the dictionary there will be an expected delay for the completed poles on the map to turn ''Green''. The reason for this is to avoid delays when working in larger dictionaries with thousands of coordinates to check. Golden Retriever first starts in the immediate area and slowly expands from there, checking points further away. This works by comparing the map points to all uploaded data. In time this will be up to date. To prioritize this step simply choose <code>Manual refresh/sync</code> from the main menu. You will then need to wait until all map points are checked. | ||
====Feedback==== | ====Feedback==== | ||
You can provide feedback to the Golden Retriever development team at any time by selecting 'Send feedback' and providing any comments or suggestions you may have. | You can provide feedback to the Golden Retriever development team at any time by selecting 'Send feedback' and providing any comments or suggestions you may have. | ||
Latest revision as of 20:55, 27 April 2022
First Time Setup
This page is still under construction and is very incomplete.
Navigating Golden Retriever
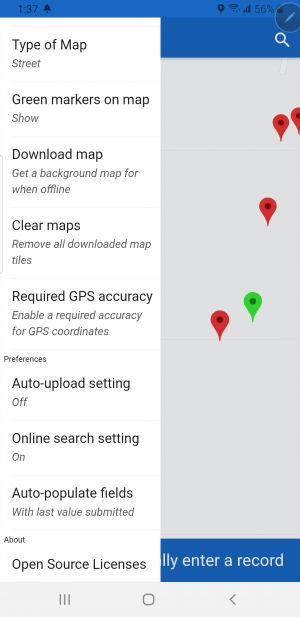
The main menu in the Golden Retriever app is in the top-left corner of the screen. All settings and maintenance actions are here scroll down to see the entire menu.
 |
 |
First Time Setup
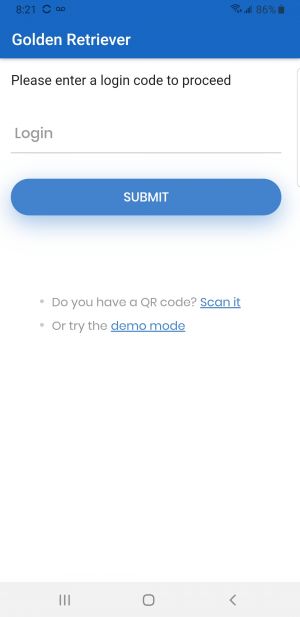
Once you have installed the mobile app from either the iOS or Android app stores you will need to scan your activation key to access your account's collection dictionaries. The first time you open the Golden Retriever app (any time you open it without login credentials) you will be presented with the login screen as shown below. You can also get to the login screen by selecting Change login code from the main menu.

There are two ways to enter the login code - scanning a QR Code or by entering the code manually. These are obtained from the License Keys menu item in the Admin Portal by your account administrator.
- Scan - Tap the Scan it link to use your device camera to scan the QR Code obtained from the Admin Portal (you will need to give permission for Golden Retriever to access the camera).
- Manually - The activation codes are quite long so normally the code would be copied (from the text or email it was sent in) and then pasted into the entry line. Because the login codes can contain special characters such as dashes '-' it is important to ensure that you copy the entire code. Once the code is entered, click the
Submitbutton.
Once the code has been accepted by the system the available dictionaries will be downloaded and a map (centered on your current location) will appear.
- Set your device name in the Change device name to your full name. If you do not set it now you will be prompted for this information the next time you open the app.
- Select Refresh dictionary list to load all of your account's active collection dictionaries (if you just scanned a license key this will be done for you). Refreshing dictionaries will need to be done any time an Administrator makes changes to the collection dictionary. After confirming that you would like to proceed (any unsaved record you may be working on will be discarded) you have the option to update every dictionary on your device or just the one you are currently in. In order to obtain new dictionaries you will need to select All at this point.
- Select the desired collection dictionary from the Change dictionary menu item. Once loaded you will enter a map view centered on your current location (as provided by your device's GPS location).
Mapping Options
Map View
You can turn the map feature on/off in the Mapping menu item.
- Enabled - map centered on your location
- Disabled - black screen with a white paw print
Map Type
You can toggle between a street map and satellite map in the Type of Map menu item.
Map Markers
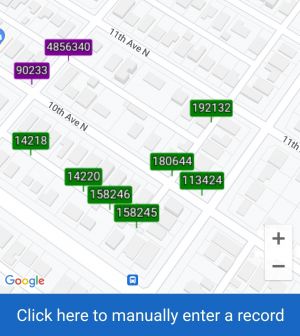
When working from a pre-populated map you will see the existing data points in red (or some other color other than green). As they have been completed they will turn to green. Due to limitations a maximum number of markers are drawn on the screen at any given time and priority is given to red ('to-do') markers. To ensure that no markers are missed it can be helpful to toggle the Green markers on map to the off setting.

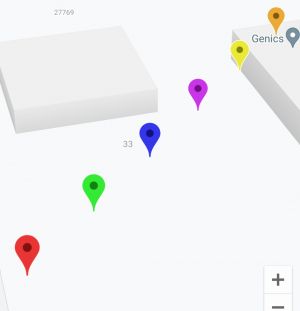
Green is reserved for completed records. Red, Blue, Purple, Yellow and Orange are currently the other colors available for the 'TO DO' map markers. These are set when the [supplied data is prepared].

Note: The colors do not show the same on iOS and Android - the colors shown here are how they display on Android.
When first select the dictionary there will be an expected delay for the completed poles on the map to turn Green. The reason for this is to avoid delays when working in larger dictionaries with thousands of coordinates to check. Golden Retriever first starts in the immediate area and slowly expands from there, checking points further away. This works by comparing the map points to all uploaded data. In time this will be up to date. To prioritize this step simply choose Manual refresh/sync from the main menu. You will then need to wait until all map points are checked.
Feedback
You can provide feedback to the Golden Retriever development team at any time by selecting 'Send feedback' and providing any comments or suggestions you may have.
