App Use: Difference between revisions
No edit summary |
No edit summary |
||
| Line 7: | Line 7: | ||
First, select ''Change Dictionary'' from the main menu. Here you will find a list of all of your account's collection dictionaries which are available to you. Yellow buttons are folders and blue buttons are the actual dictionaries. The dictionary you are looking for may be in a folder depending on how your account administrator has set it up. | First, select ''Change Dictionary'' from the main menu. Here you will find a list of all of your account's collection dictionaries which are available to you. Yellow buttons are folders and blue buttons are the actual dictionaries. The dictionary you are looking for may be in a folder depending on how your account administrator has set it up. | ||
If you don't see the dictionary you are looking for, first try refreshing your dictionaries (''Main Menu→Refresh dictionary list''). If after refreshing you still do not see the dictionary in your list contact your account administrator. | If you don't see the dictionary you are looking for, first try refreshing your dictionaries (''Main Menu→Refresh dictionary list''). If after refreshing you still do not see the dictionary in your list contact your account administrator. | ||
[[File:DictionaryOpen.png|thumb|none]] | |||
Once in the collection dictionary you will be presented by a screen showing either a map (centered on your current location) or black screen with a white paw print (it is ''Golden Retriever'' after all) depending on your [[App_Setup|Mapping]] settings in the main menu. | Once in the collection dictionary you will be presented by a screen showing either a map (centered on your current location) or black screen with a white paw print (it is ''Golden Retriever'' after all) depending on your [[App_Setup|Mapping]] settings in the main menu. | ||
====Creating Records from Pre-existing Data==== | ====Creating Records from Pre-existing Data==== | ||
When existing pole data has been uploaded into the dictionary you will see a map with red map markers on it. These markers turn green as new inspections have been completed. You may toggle the green markers on/off using the ''Green markers on map'' main menu item to ensure no undone red markers still exist. | When existing pole data has been uploaded into the dictionary you will see a map with red map markers on it. These markers turn green as new inspections have been completed. You may toggle the green markers on/off using the ''Green markers on map'' main menu item to ensure no undone red markers still exist. | ||
[[File:TurningGreen.png|thumb|none]] | |||
''Note: because the map view zooms in on your current location you may have to zoom out and scroll to the correct location if you are not physically in the area with the pole data.'' | ''Note: because the map view zooms in on your current location you may have to zoom out and scroll to the correct location if you are not physically in the area with the pole data.'' | ||
| Line 36: | Line 38: | ||
=====Local Records on Device===== | =====Local Records on Device===== | ||
In order to view records still on your device you must use the green map markers. From there you can view and edit the data by tapping the marker and then the red<code>Open local Record</code> button at the bottom of the summary bubble. | In order to view records still on your device you must use the green map markers. From there you can view and edit the data by tapping the marker and then the red<code>Open local Record</code> button at the bottom of the summary bubble. | ||
[[File:OpenLocalRecord.png|thumb|none]] | |||
====Uploading Data==== | ====Uploading Data==== | ||
Revision as of 16:08, 23 April 2020
This page is still under construction and may not be complete.
Collecting Data in Mobile App
To collect data using the mobile app you must first link your account to your device (see first Time Setup instructions).
Selecting Collection Dictionary
First, select Change Dictionary from the main menu. Here you will find a list of all of your account's collection dictionaries which are available to you. Yellow buttons are folders and blue buttons are the actual dictionaries. The dictionary you are looking for may be in a folder depending on how your account administrator has set it up.
If you don't see the dictionary you are looking for, first try refreshing your dictionaries (Main Menu→Refresh dictionary list). If after refreshing you still do not see the dictionary in your list contact your account administrator.

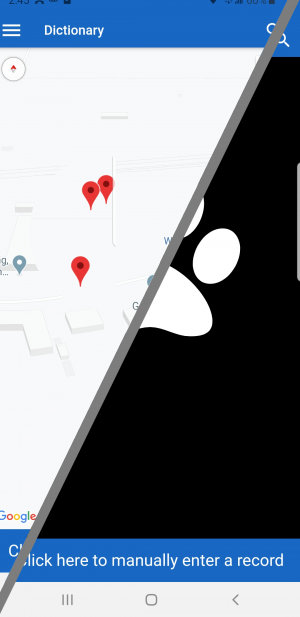
Once in the collection dictionary you will be presented by a screen showing either a map (centered on your current location) or black screen with a white paw print (it is Golden Retriever after all) depending on your Mapping settings in the main menu.
Creating Records from Pre-existing Data
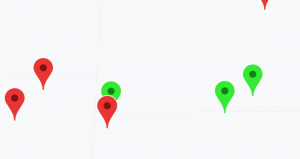
When existing pole data has been uploaded into the dictionary you will see a map with red map markers on it. These markers turn green as new inspections have been completed. You may toggle the green markers on/off using the Green markers on map main menu item to ensure no undone red markers still exist.

Note: because the map view zooms in on your current location you may have to zoom out and scroll to the correct location if you are not physically in the area with the pole data.
- To create an inspection record, tap on the marker of the pole you are at to view the details of the existing record and then tap the
Create newto create a new record based on that existing data. From here you can:- View the existing data in the collection form
- Create a new record based on the existing data, including the new inspection information. Tap the save icon at the bottom-right of the screen.
- To edit any of the supplied pole data (normally these pre-populated fields are locked by default) tap the red
Alter original databutton at the top to unlock these fields (i.e. height, class, species, etc).
- To cancel, tap the trash can icon on the bottom-left of the screen. This will exit you out of the data collection screen without creating a new record.
- To add a photo to the record simply tap the camera icon on the bottom-center of the screen. This will open your device's camera app from which you can take a photo (Image size is dependent on the device's camera app settings, so these may need to be changed if the files are too large). Selecting this multiple times will add additional photos to the record.
Creating Records from Scratch
When no existing pole data has been uploaded into the dictionary you may simply click on the button on the bottom of the screen Click here to manually enter a record. This will open the data collection screen (as set up by your account administrator).
- To save a record tap the floppy disc (save) icon at the bottom-right of the screen.
- To cancel, tap the trash can (discard) icon on the bottom-left of the screen. This will exit out of the data collection screen without creating a new record.
- To add a photo to the record simply tap the camera (take photo) icon on the bottom-center of the screen to open your device's camera app (Image size is dependent on the device's camera app settings). Selecting this multiple times will add additional photos to the record.
If you have the Auto-upload setting in the Preferences section of the main menu set to Off your map will show green markers for completed poles. Tapping on these markers will allow you to review and edit the saved record. Once the record has been uploaded its corresponding map marker will be gone from your map.
Searching Records
Online Records
Using the search icon (magnifying glass in upper-right hand corner) you may search records on the server providing that your Online search setting is set to On. You can search:
- Uploaded records by any user of the dictionary
- Utility supplied data
Some fields may not be searchable depending on how the account administrator has set up the collection dictionary.
Local Records on Device
In order to view records still on your device you must use the green map markers. From there you can view and edit the data by tapping the marker and then the redOpen local Record button at the bottom of the summary bubble.
Uploading Data
Different upload settings are available to allow for poor cellular coverage and data cost concerns. The Auto-upload setting main menu item you can be set to:
- Off - no automatic uploading of any kind. With this setting, all records and photos must be manually uploaded using the Manual upload main menu item.
- Data and photos - all records and their associated photos will be uploaded as the records are saved and cellular connectivity is available.
- Data only - all records will be uploaded automatically. Photos must still be uploaded manually.
