Data Management: Difference between revisions
No edit summary |
|||
| (23 intermediate revisions by 2 users not shown) | |||
| Line 1: | Line 1: | ||
[[Main_Page|Main Page]] | |||
__FORCETOC__ | |||
===Data Management=== | ===Data Management=== | ||
The purpose of Golden Retriever is to collect data so that it can be used for analysis and action. Tools have been and will continue to be developed to aid in this . This section describes these tools. | |||
''Please feel free to send the Golden Retriever development team any suggestions or requests that you may have.'' | |||
<br> | |||
====Databases Summary Page==== | ====Databases Summary Page==== | ||
When you click on the <code>Databases</code> menu item you will get a table showing all your account's active databases. You can toggle between active and archived by clicking on whichever of "Active databases" or "Archived databases" is in blue. Golden Retriever automatically archives any dictionary/database where the newest record is older than six months. | The Database Summary Page is the first thing you'll see when you log in to Golden Retriever. Here you will be able to find your data. When you click on the <code>Databases</code> menu item you will get a table showing all your account's active databases. You can toggle between active and archived by clicking on whichever of "Active databases" or "Archived databases" is in blue. Golden Retriever automatically archives any dictionary/database where the newest record is older than six months. | ||
<br>This table gives you basic statistics of what data (total records, etc.) | <br>This table gives you basic statistics of what data (total records, etc.) | ||
is in each dictionary. | is in each dictionary. | ||
| Line 12: | Line 15: | ||
The subfolder on the mobile app which contains the dictionary. This is set in the Dictionary Creator. | The subfolder on the mobile app which contains the dictionary. This is set in the Dictionary Creator. | ||
=====Total Records===== | =====Total Records===== | ||
The total number of records in the database. | The total number of records in the database. For example, if you have 100 pole records and 100 meter records in your database then your total count will read 200 records. | ||
=====Total Photos===== | =====Total Photos===== | ||
The total number of photos in the database. | The total number of photos in the database. | ||
| Line 20: | Line 24: | ||
Shows the most recent record uploaded. Clicking on the date will bring up a map showing the most recent record's GPS location. | Shows the most recent record uploaded. Clicking on the date will bring up a map showing the most recent record's GPS location. | ||
[[File:LastRecordUploaded.png|thumb|none|Caption:Follow link to map of record's location]] | [[File:LastRecordUploaded.png|thumb|none|Caption:Follow link to map of record's location]] | ||
In addition to the timestamp of the last upload record, one other field may be shown (set in the ''Dictionary Creator'') such as crew name or inspector name. This can assist with keeping track of where your crews are currently working. By default the unique device id will be shown but any other field in the dictionary may be used - '''''Refer to the Dictionary Creator instructions on this'''''. | |||
[[File:LastLocationMap.png|thumb|none]] | |||
=====Records Today===== | =====Records Today===== | ||
The total number of records uploaded today. | The total number of records uploaded today. | ||
| Line 25: | Line 32: | ||
The total number of photos uploaded today. | The total number of photos uploaded today. | ||
=====Hidden===== | =====Hidden===== | ||
Shows 'yes' if the dictionary hidden from the mobile app. | Shows 'yes' if the dictionary hidden from the mobile app. Normally collection dictionaries are hidden from the mobile app before and after they are required in the field, to keep the mobile system cleaner. | ||
=====Total data used===== | =====Total data used===== | ||
This is the total amount of storage used by all of your databases combined (including photos). This shows you where your account is in regards to any additional storage fees. | This is the total amount of storage used by all of your databases combined (including photos). This shows you where your account is in regards to any additional storage fees. | ||
<br><br> | <br><br> | ||
====Database View==== | ====Database View==== | ||
By clicking on a database name you will be taken to a screen showing: | By clicking on a database name you will be taken to a screen showing: | ||
| Line 34: | Line 44: | ||
*Download and Export Options | *Download and Export Options | ||
*Option to Delete Both the Database and Dictionary (''available to Admin's only'') | *Option to Delete Both the Database and Dictionary (''available to Admin's only'') | ||
<br>[[File:SortingRecords.png|none|frame]]<br> | |||
======Viewing and Sorting Records====== | ======Viewing and Sorting Records====== | ||
Columns can be moved and resized as required. clicking on a heading will sort the current list by the data in that column (database field). | Columns can be moved and resized as required. clicking on a heading will sort the current list by the data in that column (database field). | ||
| Line 40: | Line 51: | ||
[[File:SearchRecords.png|none|frame|Caption:Click <code>Find</code> to view for all records from February 14th by the inspector Bob]] | [[File:SearchRecords.png|none|frame|Caption:Click <code>Find</code> to view for all records from February 14th by the inspector Bob]] | ||
Clicking on the search button (magnifying glass icon) will bring up the search window where you can search by multiple criteria. | Clicking on the search button (magnifying glass icon) will bring up the search window where you can search by multiple criteria. | ||
======Editing Records====== | |||
To edit a record click on the record to edit. It will turn yellow when selected. Click the edit button (pen icon) to enter 'edit' mode. | |||
[[File:EditRow.png|thumb|none]] | |||
This will open the record for editing. When finished click the save button to update the record or cancel | |||
to discard changes. | |||
[[File:SaveChanges.png|none|thumb]] | |||
[[File:CancelEdit.png|none|thumb]] | |||
E''diting this data is forever. It is suggested to first download a copy of the data as a backup before editing.'' | |||
======Exporting Current View====== | ======Exporting Current View====== | ||
| Line 47: | Line 67: | ||
Clicking on either the <code>Latitude</code> or <code>Longitude</code> will open a new tab with a Google Map of that record's GPS location. | Clicking on either the <code>Latitude</code> or <code>Longitude</code> will open a new tab with a Google Map of that record's GPS location. | ||
======Viewing Photos====== | ======Viewing Photos====== | ||
The photos are located in the far right-hand column of the spreadsheet. Click on the photo names to open them in a new browser tab. To delete photos click <code>Del</code> beside the photo name. | The photos are located in the far right-hand column of the spreadsheet. | ||
[[File:OS_Photos1.png|none]] | |||
*Click on the photo names to open them in a new browser tab. | |||
*To delete photos click <code>Del</code> beside the photo name. | |||
*Additional photos can be uploaded into the record by clicking the <code>+Add</code> button | |||
<br> | <br> | ||
=====Downloading Records | Photos can be downloaded individually by saving them when they are opened in a browser tab. To download photos in batches, use the steps shown below in [[Data_Management#Downloading_Records|Downloading Records]] and select "Include photos". | ||
The records in the database may be download in a csv (comma-separated values) file. This is the most common way to get your data. The available options are: | Note: Photos and records can be downloaded together or separately depending on the checkboxes. | ||
<br><br> | |||
=====Downloading Records===== | |||
The records in the database may be download either in a <code>csv</code> (comma-separated values) file or in an <code>xlsx</code> file. This is the most common way to get your data. | |||
[[File:DownloadOptions.png|thumb|none]] | |||
The available options are: | |||
*All Data - every record in the database | *All Data - every record in the database | ||
*Incremental - only records added since your last download date | *Incremental - only records added since your last download date | ||
| Line 58: | Line 87: | ||
*Include data - a checkbox selection to include the data | *Include data - a checkbox selection to include the data | ||
*Capitalize data - a checkbox selection to capitalize all text in the data | *Capitalize data - a checkbox selection to capitalize all text in the data | ||
*Export as xlsx instead of csv - csv is the default file format | |||
*Custom Report - if available you may select a custom report for the data | *Custom Report - if available you may select a custom report for the data | ||
Click the <code>Start Download</code> button when ready. Once the Golden Retriever system has the data ready your browser's download dialog will open. | Click the <code>Start Download</code> button when ready. Once the Golden Retriever system has the data ready your browser's download dialog will open. | ||
=====Export as a Shapefile===== | =====Export as a Shapefile===== | ||
Golden Retriever gives you the option to download a shapefile of your data. This shapefile makes it easy for your utility customer to import the collected data directly into their GIS system. There are many GPS coordinate formats available. For simplicity sake Golden Retriever system has a select few options - contact us if you require additional formats and we will add them to the list. | Golden Retriever gives you the option to download a shapefile of your data. This shapefile makes it easy for your utility customer to import the collected data directly into their GIS system. You can export the entire database or just a portion of it. To limit the records exported, first filter the data in the online spreadsheet to only show the required records (by date, circuit, inspection type, etc.). | ||
[[file:OS_ExportShapefile1.png|border]] <br> | |||
There are many GPS coordinate formats available. For simplicity sake Golden Retriever system has a select few options - contact us if you require additional formats and we will add them to the list. First, select the desired 'Projection' for your GPS coordinates. | |||
[[file:OS_ExportShapefile2.png|thumb|none]] <br> | |||
Next you will need to confirm which fields containing the ''latitude'' and ''longitude'' coordinates and set a name for the shapefile. By default Latitude and Longitude are selected as these fields contain the coordinates collected by the Golden Retriever app. | |||
'''''Note: If you have performed any data filtering in the above online spreadsheet those filters will be reflected in the created shapefile.''''' | |||
There is a text entry box labelled "''Shapefile column template''". By default the shapefile will be created with each column being defined as a "String" without any defined precision on the field. Most of the time this will be more than fine however you may find the GIS you plan to add the shapefile to has certain column requirements. Such as a particular column needing to be of type "Integer" with a precision(length) of 10 digits. When you try to add the shapefile your GIS throws an error that the column is not in the correct format. In such cases you are able to paste a string into this text entry box to tell the shapefile creator to uses your specified column types and precision. | |||
You must make sure your column template string is in the following format: | |||
<pre>{"types":"ogr.OFTString,ogr.OFTString,ogr.OFTString,ogr.OFTString,ogr.OFTString,ogr.OFTString,ogr.OFTString,ogr.OFTString,ogr.OFTString,ogr.OFTString,ogr.OFTString,ogr.OFTString,ogr.OFTString,ogr.OFTString,ogr.OFTString,ogr.OFTString,ogr.OFTString,ogr.OFTString,ogr.OFTReal,ogr.OFTString,ogr.OFTString,ogr.OFTString,ogr.OFTString,ogr.OFTString,ogr.OFTString,ogr.OFTString,ogr.OFTString,ogr.OFTString,ogr.OFTString,ogr.OFTString,ogr.OFTString,ogr.OFTString","pres": [50,50,50,50,50,50,50,50,50,50,50,50,50,50,50,50,50,50,1,50,50,50,50,50,50,50,50,50,50,50,50,50]}</pre> | |||
'''Technical Description''' | |||
<div class="toccolours mw-collapsible mw-collapsed"> | |||
Expand to show detailed instructions on the required format. ''Please contact the GR team if you require any help with this.'' | |||
<div class="mw-collapsible-content"> | |||
which is a minified version of the following JSON: | |||
<pre> | |||
{ | |||
"types": "ogr.OFTString,ogr.OFTString,ogr.OFTString,ogr.OFTString,ogr.OFTString,ogr.OFTString,ogr.OFTString,ogr.OFTString,ogr.OFTString,ogr.OFTString,ogr.OFTString,ogr.OFTString,ogr.OFTString,ogr.OFTString,ogr.OFTString,ogr.OFTString,ogr.OFTString,ogr.OFTString,ogr.OFTReal,ogr.OFTString,ogr.OFTString,ogr.OFTString,ogr.OFTString,ogr.OFTString,ogr.OFTString,ogr.OFTString,ogr.OFTString,ogr.OFTString,ogr.OFTString,ogr.OFTString,ogr.OFTString,ogr.OFTString", | |||
"pres": [ | |||
50, | |||
50, | |||
50, | |||
50, | |||
50, | |||
50, | |||
50, | |||
50, | |||
50, | |||
50, | |||
50, | |||
50, | |||
50, | |||
50, | |||
50, | |||
50, | |||
50, | |||
50, | |||
1, | |||
50, | |||
50, | |||
50, | |||
50, | |||
50, | |||
50, | |||
50, | |||
50, | |||
50, | |||
50, | |||
50, | |||
50, | |||
50 | |||
] | |||
} | |||
</pre> | |||
The above is fairly self explanatory but what you are doing is defining the type and the precision of every column in the shapefile. | |||
The types that are currently available for user are: | |||
* ogr.OFTInteger | |||
* ogr.OFTString | |||
* ogr.OFTReal | |||
* ogr.OFTBinary | |||
* ogr.OFTDate | |||
* ogr.OFTTime | |||
* ogr.OFTDateTime | |||
* ogr.OFTInteger64 | |||
One thing to remember is you '''must define a type and precision for every column in your shapefile'''. If you don't you may encounter errors. | |||
</div></div> | |||
<br> | <br> | ||
Once you are ready simply click the <code>Generate Shapefile</code> button and the system will get to work on it. You will receive an email once your shapefile is ready for download - the download link will be valid for three hours. | |||
======Step by Step Instructions====== | |||
#Navigate to the desired database. | |||
#Sort data by any required criteria (''i.e. date range, inspection type''). | |||
#If applicable, select a custom report. | |||
#Select a specific Projection if required or leave the default. | |||
#Select the correct Longitude and Latitude fields. ''This should default correctly unless a custom report is being used.'' | |||
#Paste the ''Column Template'' into the Shapefile Column Template box. | |||
#Enter your desired file name. | |||
#Click <code>Generate Shapefile</code> | |||
#Monitor your email for download link or error messages. | |||
'''''Note: To select a date range for a shapefile this must be done in the online spreadsheet filters.''''' | |||
<br> | |||
=====Send data to ArcGIS===== | =====Send data to ArcGIS===== | ||
For users who have a paid ArcGIS account you may enter your account information and then send your data to that account to make an online map available to you and any of your customers who need it. Instructions are [[Export_to_ArcGIS|here]]. | For users who have a paid ArcGIS account you may enter your account information and then send your data to that account to make an online map available to you and any of your customers who need it. Instructions are [[Export_to_ArcGIS|here]]. | ||
Click the <code>Send to ArcGIS</code> to send the data to ArcGIS. | Click the <code>Send to ArcGIS</code> to send the data to ArcGIS. | ||
<br> | <br> | ||
=====Deleting Dictionaries===== | |||
If a collection dictionary '''''and''''' it's associated data are no longer required (housekeeping or storage costs) you may delete them here. At the very bottom of each database page is a <code>Delete</code> button in red font. This will delete your collection dictionary and all data in it. Once you have deleted the dictionary and database your ''Total data used'' will be adjusted. | |||
[[File:DeleteDictionary.png|thumb|none]] | |||
Note: This will delete '''''both''''' your collection dictionary '''''and''''' all of the data currently in this database. | |||
[[File:DeleteDictionaryConfirm.png|thumb|none]] | |||
Latest revision as of 17:39, 16 February 2022
Data Management
The purpose of Golden Retriever is to collect data so that it can be used for analysis and action. Tools have been and will continue to be developed to aid in this . This section describes these tools.
Please feel free to send the Golden Retriever development team any suggestions or requests that you may have.
Databases Summary Page
The Database Summary Page is the first thing you'll see when you log in to Golden Retriever. Here you will be able to find your data. When you click on the Databases menu item you will get a table showing all your account's active databases. You can toggle between active and archived by clicking on whichever of "Active databases" or "Archived databases" is in blue. Golden Retriever automatically archives any dictionary/database where the newest record is older than six months.
This table gives you basic statistics of what data (total records, etc.)
is in each dictionary.

Name
The dictionary/database name
Group
The subfolder on the mobile app which contains the dictionary. This is set in the Dictionary Creator.
Total Records
The total number of records in the database. For example, if you have 100 pole records and 100 meter records in your database then your total count will read 200 records.
Total Photos
The total number of photos in the database.
Size
The total amount of storage memory.
Last Record Uploaded
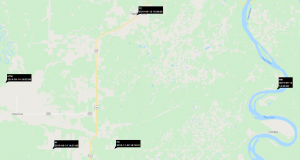
Shows the most recent record uploaded. Clicking on the date will bring up a map showing the most recent record's GPS location.
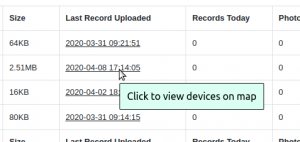
In addition to the timestamp of the last upload record, one other field may be shown (set in the Dictionary Creator) such as crew name or inspector name. This can assist with keeping track of where your crews are currently working. By default the unique device id will be shown but any other field in the dictionary may be used - Refer to the Dictionary Creator instructions on this.
Records Today
The total number of records uploaded today.
Photos Today
The total number of photos uploaded today.
Hidden
Shows 'yes' if the dictionary hidden from the mobile app. Normally collection dictionaries are hidden from the mobile app before and after they are required in the field, to keep the mobile system cleaner.
Total data used
This is the total amount of storage used by all of your databases combined (including photos). This shows you where your account is in regards to any additional storage fees.
Database View
By clicking on a database name you will be taken to a screen showing:
- All Data (Records) in the Database
- Download and Export Options
- Option to Delete Both the Database and Dictionary (available to Admin's only)

Viewing and Sorting Records
Columns can be moved and resized as required. clicking on a heading will sort the current list by the data in that column (database field).
Search Records
At the bottom of the online spreadsheet are options to view, sort, search, add, edit and delete records.

Find to view for all records from February 14th by the inspector BobClicking on the search button (magnifying glass icon) will bring up the search window where you can search by multiple criteria.
Editing Records
To edit a record click on the record to edit. It will turn yellow when selected. Click the edit button (pen icon) to enter 'edit' mode.
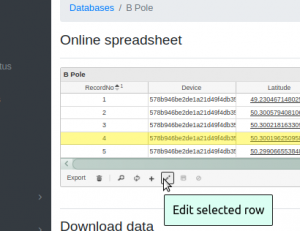
This will open the record for editing. When finished click the save button to update the record or cancel to discard changes.
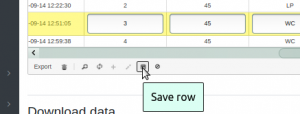
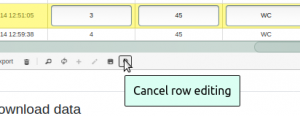
Editing this data is forever. It is suggested to first download a copy of the data as a backup before editing.
Exporting Current View
Once you have the data sorted the way you want you can click the Export button in the bottom-left corner of the spreadsheet to download a csv file of exactly what is currently shown. The csv file can then be opened in a spreadsheet program such as Excel or Libreoffice Calc.
Viewing the Record's GPS Location
Clicking on either the Latitude or Longitude will open a new tab with a Google Map of that record's GPS location.
Viewing Photos
The photos are located in the far right-hand column of the spreadsheet.
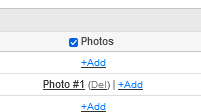
- Click on the photo names to open them in a new browser tab.
- To delete photos click
Delbeside the photo name. - Additional photos can be uploaded into the record by clicking the
+Addbutton
Photos can be downloaded individually by saving them when they are opened in a browser tab. To download photos in batches, use the steps shown below in Downloading Records and select "Include photos".
Note: Photos and records can be downloaded together or separately depending on the checkboxes.
Downloading Records
The records in the database may be download either in a csv (comma-separated values) file or in an xlsx file. This is the most common way to get your data.
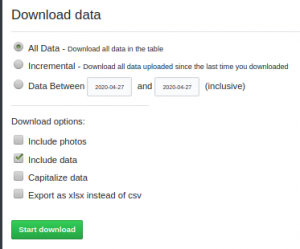
The available options are:
- All Data - every record in the database
- Incremental - only records added since your last download date
- Data Between - choose and date range to download data from
- Include photos - a checkbox selection to include the photos
- Include data - a checkbox selection to include the data
- Capitalize data - a checkbox selection to capitalize all text in the data
- Export as xlsx instead of csv - csv is the default file format
- Custom Report - if available you may select a custom report for the data
Click the Start Download button when ready. Once the Golden Retriever system has the data ready your browser's download dialog will open.
Export as a Shapefile
Golden Retriever gives you the option to download a shapefile of your data. This shapefile makes it easy for your utility customer to import the collected data directly into their GIS system. You can export the entire database or just a portion of it. To limit the records exported, first filter the data in the online spreadsheet to only show the required records (by date, circuit, inspection type, etc.).

There are many GPS coordinate formats available. For simplicity sake Golden Retriever system has a select few options - contact us if you require additional formats and we will add them to the list. First, select the desired 'Projection' for your GPS coordinates.
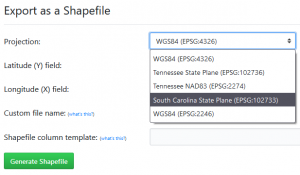
Next you will need to confirm which fields containing the latitude and longitude coordinates and set a name for the shapefile. By default Latitude and Longitude are selected as these fields contain the coordinates collected by the Golden Retriever app.
Note: If you have performed any data filtering in the above online spreadsheet those filters will be reflected in the created shapefile.
There is a text entry box labelled "Shapefile column template". By default the shapefile will be created with each column being defined as a "String" without any defined precision on the field. Most of the time this will be more than fine however you may find the GIS you plan to add the shapefile to has certain column requirements. Such as a particular column needing to be of type "Integer" with a precision(length) of 10 digits. When you try to add the shapefile your GIS throws an error that the column is not in the correct format. In such cases you are able to paste a string into this text entry box to tell the shapefile creator to uses your specified column types and precision.
You must make sure your column template string is in the following format:
{"types":"ogr.OFTString,ogr.OFTString,ogr.OFTString,ogr.OFTString,ogr.OFTString,ogr.OFTString,ogr.OFTString,ogr.OFTString,ogr.OFTString,ogr.OFTString,ogr.OFTString,ogr.OFTString,ogr.OFTString,ogr.OFTString,ogr.OFTString,ogr.OFTString,ogr.OFTString,ogr.OFTString,ogr.OFTReal,ogr.OFTString,ogr.OFTString,ogr.OFTString,ogr.OFTString,ogr.OFTString,ogr.OFTString,ogr.OFTString,ogr.OFTString,ogr.OFTString,ogr.OFTString,ogr.OFTString,ogr.OFTString,ogr.OFTString","pres": [50,50,50,50,50,50,50,50,50,50,50,50,50,50,50,50,50,50,1,50,50,50,50,50,50,50,50,50,50,50,50,50]}
Technical Description
Expand to show detailed instructions on the required format. Please contact the GR team if you require any help with this.
which is a minified version of the following JSON:
{
  "types": "ogr.OFTString,ogr.OFTString,ogr.OFTString,ogr.OFTString,ogr.OFTString,ogr.OFTString,ogr.OFTString,ogr.OFTString,ogr.OFTString,ogr.OFTString,ogr.OFTString,ogr.OFTString,ogr.OFTString,ogr.OFTString,ogr.OFTString,ogr.OFTString,ogr.OFTString,ogr.OFTString,ogr.OFTReal,ogr.OFTString,ogr.OFTString,ogr.OFTString,ogr.OFTString,ogr.OFTString,ogr.OFTString,ogr.OFTString,ogr.OFTString,ogr.OFTString,ogr.OFTString,ogr.OFTString,ogr.OFTString,ogr.OFTString",
  "pres": [
    50,
    50,
    50,
    50,
    50,
    50,
    50,
    50,
    50,
    50,
    50,
    50,
    50,
    50,
    50,
    50,
    50,
    50,
    1,
    50,
    50,
    50,
    50,
    50,
    50,
    50,
    50,
    50,
    50,
    50,
    50,
    50
  ]
}
The above is fairly self explanatory but what you are doing is defining the type and the precision of every column in the shapefile.
The types that are currently available for user are:
- ogr.OFTInteger
- ogr.OFTString
- ogr.OFTReal
- ogr.OFTBinary
- ogr.OFTDate
- ogr.OFTTime
- ogr.OFTDateTime
- ogr.OFTInteger64
One thing to remember is you must define a type and precision for every column in your shapefile. If you don't you may encounter errors.
Once you are ready simply click the Generate Shapefile button and the system will get to work on it. You will receive an email once your shapefile is ready for download - the download link will be valid for three hours.
Step by Step Instructions
- Navigate to the desired database.
- Sort data by any required criteria (i.e. date range, inspection type).
- If applicable, select a custom report.
- Select a specific Projection if required or leave the default.
- Select the correct Longitude and Latitude fields. This should default correctly unless a custom report is being used.
- Paste the Column Template into the Shapefile Column Template box.
- Enter your desired file name.
- Click
Generate Shapefile - Monitor your email for download link or error messages.
Note: To select a date range for a shapefile this must be done in the online spreadsheet filters.
Send data to ArcGIS
For users who have a paid ArcGIS account you may enter your account information and then send your data to that account to make an online map available to you and any of your customers who need it. Instructions are here.
Click the Send to ArcGIS to send the data to ArcGIS.
Deleting Dictionaries
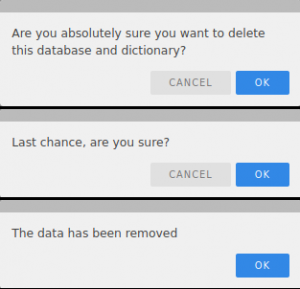
If a collection dictionary and it's associated data are no longer required (housekeeping or storage costs) you may delete them here. At the very bottom of each database page is a Delete button in red font. This will delete your collection dictionary and all data in it. Once you have deleted the dictionary and database your Total data used will be adjusted.
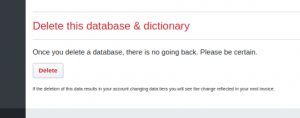
Note: This will delete both your collection dictionary and all of the data currently in this database.
